Kaltura Capture: record, narrate, & share what’s on your screen.
What is Kaltura Capture?
To use Kaltura Capture you will need
- A computer with a built-in camera and microphone or a separate web camera. If you need a webcam, we recommend buying this model. You can borrow one from the Help Desk (212-998-0180, helpdesk@stern.nyu.edu) for 48 hours if you need one to use or experiment with before you can get your own.
- An internet connection.
Step 1: Login and Download Kaltura Capture
- Navigate to stream.nyu.edu and login with your NYU NetID.
- Find Add New on the top right of the browser window, click, and select Kaltura Capture from the drop-down menu.
- If it's your first time using this tool click Download for Windows or Download for Mac and install the software. Once it’s installed, repeat steps 1 and 2.
- Select Open Kaltura Capture to launch the software.
Step 2: Record your screen
A control panel with four buttons will appear. Left to right, these buttons allow you to begin recording, select a screen to capture, select a camera input, and select a microphone source. The Camera and Screen buttons can also be configured by using the drop down arrows to record two screens and two cameras.
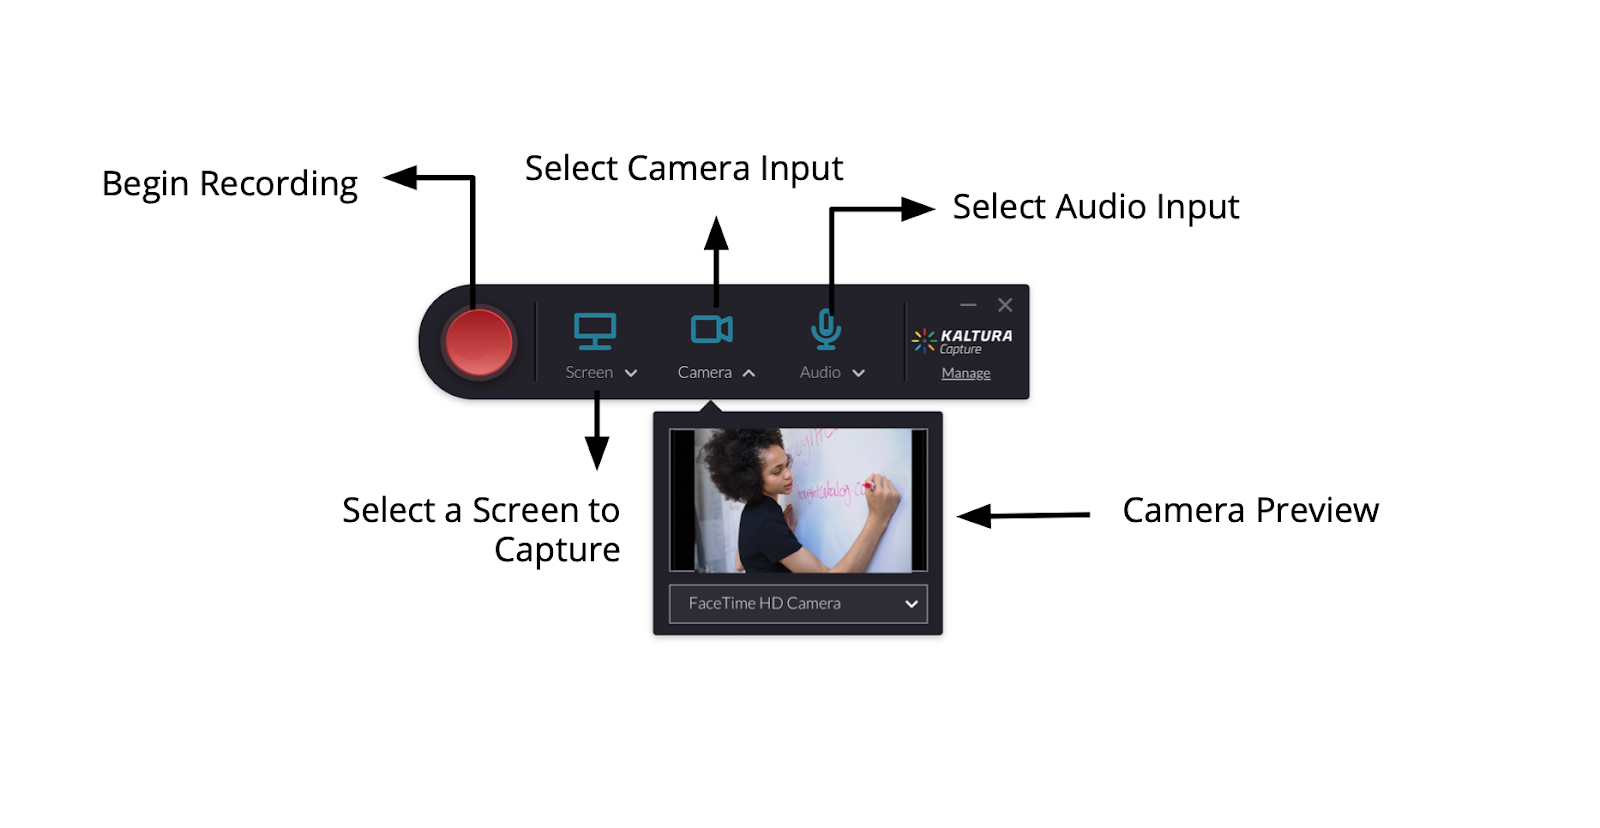
1. Begin Recording: To begin recording, click the red button. A 3-second countdown will begin to give you a chance to prepare for the beginning of the presentation. Then simply walk through the presentation. You can advance slides, visit websites, or capture anything that is on your screen. If you set up a camera, it will capture you as you record. Note: you won't see a live thumbnail of what your camera is capturing as you record.
2. Pause & Resume: If you need to pause at any time, select the pause button. When you click it again, it will resume recording.
3. Finish Recording: When you're finished, click the square stop button. The software will ask you to confirm that you want to stop recording.
Step 3: Save your video
After you click “Yes, stop it”, the software will open up your video library, where you will be able to retitle the video, add a description, and add tags.
You'll then have three options.
- You can delete the video
- You can save and upload, which will immediately send the video to your private NYU Stream media library.
- You can save the file locally. This is especially helpful if you want to record and you don't have an active internet connection (you will be able to upload the video to your media library later) or use the recording somewhere other than NYU Classes.
Step 4: Share the video in your course site
The easiest way to share your video with students in your courses is to embed your video into a Lessons Page. Click below for a tutorial on how to add Lessons to your course site:
Guide: How to add Lessons Pages to your course site
- On a Lessons Page, choose Add Content at the top of the page or, if you already have content on the page, you can also select the "+" button below where you want to insert the video.
- Choose Add Text and find the Film Strip icon in the top row of icons.
- Now you can add any videos that you have uploaded to NYU Stream. My Media means all of your videos in NYU Stream, Media Gallery is the selection of your videos already published to this particular course. Any video chosen from My Media automatically becomes a part of the Media Gallery for this course.
- Choose </> Embed on the video you would like to use. If this is greyed out, you'll need to click Edit, then scroll down and accept the terms and conditions. Now you'll be able to embed the video.
- Click Save.